Stories

Koinè, elegance and purity of forms.
“Koiné in ancient Greek means <<common language>>.
For us design means finding a timeless and borderless alphabet, detached from the personal style or taste. Our goal is to provide products that speak to every mankind in the world. We are driven and inspired by performance, ergonomics and functionality, like a beautiful sailing boat that is designed to suit the flow of the water and wind and as a result is beautiful.(…) Our vision is to create a family of products that can cover the widest possible range of environments and configurations, improve people lives and use less energy.”
Mandalaki
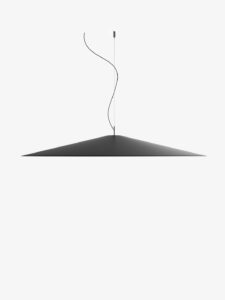
Koinè Suspension,
Designed by Mandalaki Studio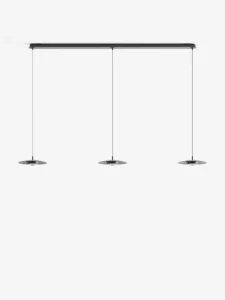
Koinè cluster Suspension,
Designed by Mandalaki Studio
Koinè acoustic Suspension,
Designed by Mandalaki Studio
Koinè Floor,
Designed by Mandalaki Studio
Koinè Wall,
Designed by Mandalaki StudioA perfect alchemy between technology, formal purity and elegance

Elegance and purity of style characterise this set of suspension lamps named Koinè, referring to its shape which offers such extreme versatility. The real heart of the project lies, however, not in the product design but in the lighting mechanism inside. This is where Koinè’s great innovation lies.
A specifically created mineral lens has in fact been applied to the light source. The beam of light transmitted through the lens appears homogeneous and clear, a wide cone of light with clearly defined edges.

The borderline between light and shadow becomes precise, without mingling. Thanks to careful orientation of the light, Koinè never causes glare and thus ensures total luminous comfort.
The core of the project is still the light source, to which to apply a custom-designed mineral lens. The beam of light conveyed by the lens is homogeneous and clean, a cone of light that is wide yet at the same time has clear contours.


The reflector is a cap with a mainly decorative role. The geometry of the ceiling plate echoes that of the diffuser. Koinè comes in four sizes (37, 55, 86 and 110 cm in diameter) and the height of the unit is always limited.
Koinè is presented in black, white, red, blue for each version.

Koinè becomes a family

Besides the suspension model, the series includes the acoustic version and recently has been expanded with the wall and cluster typology. Alongside high technological and luminous performance, Koinè offers a sound-absorbing version and adds another innovative feature.
The reflector becomes a cap in 60% recycled felt, an effective aesthetic touch that permits improvement of acoustic comfort in spaces, reducing reverberation and propagation of sound waves. This version is available in two sizes: 110 cm or 86 cm.

The new wall version with plug attachment has a structure composed of a slender stem (8 mm) that supports the reflector (diameter 20 cm), which contains the light source.
The suspension version with a reflector measuring Ø 20 cm conserves the characteristic conical form. It can be installed as a single lighting point, or connected to a linear multiple plate with three descending points, each capable of hosting one luminous part. Thanks to the possibility of grouping various plates that guarantee constant power supply and permit rotation of ± 90°, it is possible to distribute a large quantity of lighting points based on infinite geometric configurations.
